Lecture 1 Introduction
This course focuses on Android Development. But what is Android?
Android is an operating system. That is, it’s software that connects hardware to software and provides general services. But more than that, it’s a mobile specific operating system: an OS designed to work on mobile (read: handheld, wearable, carry-able) devices.
- Note that the term “Android” also is used to refer to the “platform” (e.g., devices that use the OS) as well as the ecosystem that surrounds it. This includes the device manufacturers who use the platform, and the applications that can be built and run on this platform. So “Android Development” technically means developing applications that run on the specific OS, it also gets generalized to refer to developing any kind of software that interacts with the platform.
1.1 Android History
If you’re going to develop systems for Android, it’s good to have some familiarity with the platform and its history, if only to give you perspective on how and why the framework is designed the way it is.
2003: The platform was originally founded by a start-up “Android Inc.” which aimed to build a mobile OS operating system (similar to what Nokia’s Symbian was doing at the time)
2005: Android was acquired by Google, who was looking to get into mobile
2007: Google announces the Open Handset Alliance, a group of tech companies working together to develop “open standards” for mobile platforms. Members included phone manufacturers like HTC, Samsung, and Sony; mobile carriers like T-Mobile, Sprint, and NTT DoCoMo; hardware manufacturers like Broadcom and Nvidia; and others. The Open Handset Alliance now (2017) includes 86 companies.
- Note this is the same year the first iPhone came out!
2008: First Android device is released: the HTC Dream (a.k.a. T-Mobile G1)
Specs: 528Mhz ARM chip; 256MB memory; 320x480 resolution capacitive touch; slide-out keyboard! Author’s opinion: a fun little device.
2010: First Nexus device is released: the Nexus One. These are Google-developed “flagship” devices, intended to show off the capabilities of the platform.
Specs: 1Ghz Scorpion; 512MB memory; .37" at 480x800 AMOLED capacitive touch.
- For comparison, the iPhone 7 Plus (2016) has: 2.34Ghz dual core A10 64bit Fusion; 3GB RAM; 5.5" at 1920x1080 display.
As of 2016, this program has been superceded by the Pixel range of devices.
2014: Android Wear, a version of Android for wearable devices (watches) is announced.
2016: Daydream, a virtual reality (VR) platform for Android is announced
In short, Google keeps pushing the platform wider so it includes more and more capabilities.
Today, Android is incredibly popular (to put it mildly). Android is incredibly popular! (see e.g., here, here, and here)
- In any of these analyses there are some questions about what exactly is counted… but what we care about is that there are a lot of Android devices out there! And more than that: there are a lot of different devices!
1.1.1 Android Versions
Android has gone through a large number of “versions” since it’s release:
| Date | Version | Nickname | API Level |
|---|---|---|---|
| Sep 2008 | 1.0 | Android | 1 |
| Apr 2009 | 1.5 | Cupcake | 3 |
| Sep 2009 | 1.6 | Donut | 4 |
| Oct 2009 | 2.0 | Eclair | 5 |
| May 2010 | 2.2 | Froyo | 8 |
| Dec 2010 | 2.3 | Gingerbread | 9 |
| Feb 2011 | 3.0 | Honeycomb | 11 |
| Oct 2011 | 4.0 | Ice Cream Sandwich | 14 |
| July 2012 | 4.1 | Jelly Bean | 16 |
| Oct 2013 | 4.4 | KitKat | 19 |
| Nov 2014 | 5.0 | Lollipop | 21 |
| Oct 2015 | 6.0 | Marshmallow | 23 |
| Aug 2016 | 7.0 | Nougat | 24 |
| Mar 2017 | O preview | Android O Developer Preview |
Each different “version” is nicknamed after a dessert, in alphabetica order. But as developers, what we care about is the API Level, which indicates what different programming interfaces (classes and methods) are available to use.
- You can check out an interactive version of the history through Marshmallow at https://www.android.com/history/
- For current usage breakdown, see https://developer.android.com/about/dashboards/
Additionally, Android is an “open source” project released through the “Android Open Source Project”, or ASOP. You can find the latest version of the operating system code at https://source.android.com/; it is very worthwhile to actually dig around in the source code sometimes!
While new versions are released fairly often, this doesn’t mean that all or even many devices update to the latest version. Instead, users get updated phones historically by purchasing new devices (every 18m on average in US). Beyond that, updates—including security updates—have to come through the mobile carriers, meaning that most devices are never updated beyond the version that they are purchases with.
- This is a problem from a consumer perspective, particularly in terms of security! There are some efforts on Google’s part to to work around this limitation by moving more and more platform services out of the base operating system into a separate “App” called Google Play Services.
- But what this means for developers is that you can’t expect devices to be running the latest version of the operating system—the range of versions you need to support is much greater than even web development!
1.1.2 Legal Battles
When discussing Android history, we would be remiss if we didn’t mention some of the legal battles surrounding Android. The biggest of these is Oracle v Google. In a nutshell, Oracle claims that the Java API is copyrighted (that the method signatures themeselves and how they work are protected), so because Google uses that API in Android, Google is violating the copyright. In 2012 a California federal judge decided in Google favor (that one can’t copyright an API). This was then reversed by the Federal Circuit court in 2014. The verdict was appealed to the Supreme courset in 2015, who refused to hear the case. It then went back to the the district court, which ruled that Google’s use of the API was fair use. See https://www.eff.org/cases/oracle-v-google for a summary, as well as https://arstechnica.com/series/series-oracle-v-google/
- One interesting side effect of this battle: the latest version of Android (Nougat) uses the OpenJDK implementation of Java, instead of Google’s own in-violation-but-fair-use implementation see here. This change shouldn’t have any impact on us as developers, but it’s worth keeping an eye out for potentially differences between Android and Java SE.
There have been other legal challenges as well. While not directly about Android, the other major relevant court battle is Apple v Samsung. In this case, Apple claims that Samsung infringed on their intellectual property (their design patents). This has gone back and forth in terms of damages and what is considered infringing; the latest development is that the Supreme Court heard the case and sided with Samsung that infringing design patents shouldn’t lead to damages in terms of the entire device… it’s complicated (the author is not a lawyer).
So overall: Android is a growing, evolving platform that is embedded in and affecting the social infrastructures around information technology in numerous ways.
1.2 Android Architecture and Code
Developing Android applications involves interfacing with the Android platform and framework. Thus you need a high level understanding of the architecture of the Android platform. See https://source.android.com/devices/ for more details.
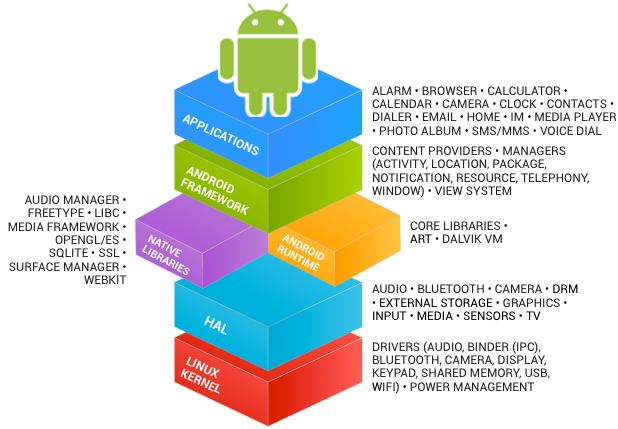
Android Architecture (image from: hub4tech)
Like so many other systems, the Android platform is built as a layered architecture:
At it’s base, Android runs on a Linux kernel for interacting with the device’s processor, memory, etc. Thus an Android device can be seen as a Linux computer.
On top of that kernel is the Hardware Abstraction Layer: an interface to drivers that can programmatically access hardware elements, such as the camera, disk storage, Wifi antenna, etc.
- These drivers are generally written in C; we won’t interact with them directly in this course.
On top of the HAL is the Runtime and Android Framework, which provides a set of abstraction in the Java language which we all know an love. For this course, Android Development will involve writing Java applications that interact with the Android Framework layer, which handles the task of interacting with the device hardware for us.
1.2.1 Programming Languages
There are two programming languages we will be working with in this course:
Java: Android code (program control and logic, as well as data storage and manipulation) is written in Java.
Writing Android code will feel a lot writing any other Java program: you create classes, define methods, instantiate objects, and call methods on those objects. But because you’re working within a framework, there is a set of code that already exists to call specific methods. As a developer, your task will be to fill in what these methods do in order to run your specific application.
In web terms, this is closer to working with Angular (a framework) than jQuery (a library).
Importantly: this course expects you to have “journeyman”-level skills in Java (apprenticeship done, not yet master). We’ll be using a number of intermediate concepts (like generics and inheritance) without much fanfare or explanation (though see the appendix).
XML: Android user interfaces and resources are specified in XML (EXtensible Markup Language). To compare to web programming: the XML contains what would normally go in the HTML/CSS, while the Java code will contain what would normally go in the JavaScript.
XML is just like HTML, but you get to make up your own tags. Except we’ll be using the ones that Android made up; so it’s like defining web pages, except with a new set of elements. This course expects you to have some familiarity with HTML or XML, but if not you should be able to infer what you need from the examples.
1.2.2 Building Apps
As stated above, we will write code in Java and XML. But how does that code get run on the phone’s hardware?
Pre-Lollipop (5.0), Android code ran on Dalvik: a virtual machine similar to the JVM used by Java SE.
- Fun fact for people with a Computer Science background: Dalvik uses a register-based architecture rather than a stack-based one!
A developer would write Java code, which would then be compiled into JVM bytecode, which would then be translated into DVM (Dalvik virtual machine) bytecode, that could be run on Android devices. This DVM bytecode was stored in .dex or .odex (“[Optimized] Dalvik Executable”) files, which is what was loaded onto the device. The process of converting from Jave code to dex files is called “dexing” (so code that has been built is “dexed”).
Dalvik does include JIT (“Just In Time”) compilation to native code that runs much faster than the code interpreted by the virtual machine, similar to the Java HotSpot. This navite code is faster because no translation step is needed to talk to the actual hardware (the OS).
From Lollipop (5.0) on, Android instead uses Android Runtime (ART) to run code. ART’s biggest benefit is that it compiles the .dex bytecode into native code on installation using AOT (“Ahead of Time”) compilation. ART continues to accept .dex bytecode for backwards compatibility (so the same dexing process occurs), but the code that is actually installed and run on a device is native. This allows for applications to have faster execution, but at the cost of longer install times—but since you only install an application once, this is a pretty good trade.
After being built, Android applications (the source, dexed bytecode, and any resources) are packaged into .apk files. These are basically zip files (they use the same gzip compression); if you rename the file to be .zip and you can unpackage them! The .apk files are then cryptographically signed to specify their authenticity, and either “side-loaded” onto the device or uploaded to an App Store for deployment.
The signed
.apkfiles are basically the “executable” versions of your program!Note that the Android application framework code is actually “pre-DEXed” (pre-compiled) on the device; when you write code, you’re actually compiling against empty code stubs (rather than needing to include those classes in your
.apk)! That said, any other 3rd-party libraries you include will be copied into your built App, which can increase its file size both for installation and on the device.
To summarize, in addition to writing Java and XML code, when building an App you need to:
- Generate Java source files (e.g., from resource files, which are written XML used to generate Java code)
- Compile Java code into JVM bytecode
- “dex” the JVM bytecode into Dalvik bytecode
- Pack in assets and graphics into an APK
- Cryptographically sign the APK file to verify it
- Load it onto the device
There are a lot of steps here, but there are tools that take care of it for us. We’ll just write Java and XML code and run a “build” script to do all of the steps!
1.3 Development Tools
There are a number of different hardware and software tools you will need to do Android development:
1.3.1 Hardware
Since Android code is written for a virtual machine anyway, Android apps can be developed and built on any computer’s operating system (unlike some other mobile OS…).
But obviously Android apps will need to be run on Android devices. Physical devices are the best for development (they are the fastest, easiest way to test), though you’ll need USB cable to be able to wire your device into your computer. Any device will work for this course; you don’t even need cellular service (just WiFi should work). Note that if you are unfamiliar with Android devices, you should be sure to play around with the interface to get used to the interaction language, e.g., how to click/swipe/drag/long-click elements to use an app.
- You will need to turn on developer options in order to install development apps on your device!
If you don’t have a physical device, it is also possible to use the Android Emulator, which is a “virtual” Android device. The emulator represents a generic device with hardware you can specify… but it does have some limitations (e.g., no cellular service, no bluetooth, etc).
- While it has improved recently, the Emulator historically does not work very well on Windows; I recommend you develop on either a Mac or a physical device. In either case, make sure you have enabled HAXM (Intel’s Acceleration Manager, which allows the emulator to utilize your GPU for rendering): this speeds things up considerably.
1.3.2 Software
Software needed to develop Android applications includes:
The Java 7 SDK (not just the JRE!) This is because you’re writing Java code!
Gradle or Apache ANT. These are automated build tools—in effect, they let you specify a single command that will do a bunch of steps at once (e.g., compile files, dex files, move files, etc). These are how we make the “build script” that does the 6 build steps listed above.
ANT is the “old” build system, Gradle is the “modern” build system (and so what we will be focusing on).
Note that you do not need to install Gradle separately for this course.
Android Studio & Android SDK is the official IDE for developing Android applications. Note that the IDE comes bundled with the SDK. Android Studio provides the main build system: all of the other software (Java, Gradle) goes to support this.
The SDK comes with a number of useful command-line tools. These include:
adb, the “Android Device Bridge”, which is a connection between your computer and the device (physical or virtual). This tool is used for console output!emulator, which is a tool used to run the Android emulator- deprecated/removed
android: a tool that does SDK/AVD (Android Virtual Device) management. Basically, this command-line utility did everything that the IDE did, but from the command-line! It has recently been removed from the IDE.
I recommend making sure that the SDK command-line tools are installed. Put the
toolsandplatform-toolsfolders on your computer’sPATH; you can runadbto check that everything works. All of these tools are built into the IDE, but they can be useful fallbacks for debugging.
1.4 Hello World
As a final introductory steps, this lecture will walk you through creating and running a basic App so that you can see what you will actually be working with. You will need to have Android Studio installed for this to work.
Launch Android Studio if you have it (may take a few minutes to open)
Start a new project.
Use your UW NetID in the domain.
Make a mental note of the project location so you can find your code later!
Target: this is the “minimum” SDK you support. We’re going to target Ice Cream Sandwich (4.0.3, API 15) for most this class, as the earliest version of Android most our apps will support.
- Note that this is different than the “target SDK”, which is the version of Android you tested your application against (e.g., what system did you run it on?) For this course we will be testing on API 21 (Lollipop); we’ll specify that in a moment.
Select an Empty Activity
- Activities are “Screens” in your application (things the user can do). Activities are discussed in more detail in the next lecture.
And boom, you have an Android app! Aren’t frameworks lovely?
1.4.1 The Emulator
We can run our app by clicking the “Play” or “Run” button at the top of the IDE. But we’ll need a device to run the app on, so let’s make an emulator!
The Nexus 5 is a good choice for supporting “older” devices. The new Pixel is also a reasonable device to test against.
You’ll want to make sure you create a Lollipop device, using the Google APIs (so we have special classes available to us), and amost certainly running on x86 (Intel) hardware
Make sure that you’ve specified that it accepts keyboard input. You can always edit this emulator later (
Tools > Android > AVD Manager).
After the emulator boots, you can slide to unlock, and there is our app!
1.4.2 Project Contents
So what does our app look like in code? What do we have?
Note that Android Studio by default shows the “Android” view, which organizes files thematically. If you go to the “Project” view you can see what the actual file system looks like. In Android view, files are organized as follows:
app/folder contains our applicationmanifests/contains the Android Manifest files, which is sort of like a “config” file for the appjava/contains the Java source code for your project. You can find theMyActivityfile in hereres/contains resource files used in the app. These are where we’re going to put layout/appearance information
Also have the
Gradlescripts. There are a lot of these:build.gradle: Top-level Gradle build; project-level (for building!)app/build.gradle: Gradle build specific to the app use this one to customize project!. We can change the Target SDK in here!proguard-rules.pro: config for release version (minimization, obfuscation, etc).gradle.properties: Gradle-specific build settings, sharedlocal.properties: settings local to this machine onlysettings.gradle: Gradle-specific build settings, shared
Note that ANT would instead give:
build.xml: Ant build script integrated with Android SDKbuild.properties: settings used for build across all machineslocal.properties: settings local to this machine only
We’re using Gradle, but it is good to be aware of ANT stuff for legacy purposes
reshas resource files. These are XML files that specify details of the app–such as layout.res/drawable/: contains graphics (PNG, JPEG, etc)res/layout/: contains UI XML layout filesres/mipmap/: conatins launcher icon files in different resolutions- Fun fact: MIP stands for “multum in parvo”, which is Latin for “much in little” (because multiple resolutions of the images are stored in a single file). “Map” is used because Mipmaps are normally used for texture mapping.
res/values/: contains XML definitions for general constants
See also: http://developer.android.com/guide/topics/resources/available-resources.html, or Lecture 3.
We can also consider what the application code does. While we’ll revisit this in more detail in the next lecture, it’s useful to start seeing how the framework is structured:
We’ll start with the MyActivity Java source file. This class extends Activity (actually it extends a subclass that supports Material Design components), allowing us making our own customizations to what the app does.
In this class, we override the onCreate() method that is called by the framework when the Activity starts (see next lecture).
- We call the super method, and then
setContentView()to specify what the content (appearance) of our Activity is. This is passed in a value from something calledR.Ris a class that is generated at compile time and contains constants that are defined by the XML “resource” files! Those files are converted into Java variables, which we can access through theRclass.
R.layout refers to the “layout” XML resource, so can go there (remember: inside res/). Opening these XML files they appear in a “design” view. This view lets you use a graphical system to lay out your application (similar to a PowerPoint slide).
- However, even as the design view becomes more powerful, using it is still frowned upon by many developers for historical reasons. It’s often cleaner to write out the layouts and content in code. This is the same difference between writing your own HTML and using something like FrontPage or DreamWeaver or Wix to create a page. While those are legitimate applications, they are less “professional”.
In the code view, we can see the XML: tags, attributes, values. Tags nested inside one another. The provided XML code defines a layout, and inside that is a TextView (a View representing some text), which has a value: text! We can change that and then re-run the app to see it update!
- It’s also possible to define this value in
values/strings(e.g., as a constant), then refer to as@string/message. More on this proces later.
Finally, as a fun demonstration, try to set an icon for the App (in Android Studio, go to: File > New > Image Asset)