Lecture 2 Activities and Logging
This lecture introduces Activities, which are the basic component used in Android applications. It aims to demonstrate how the interactive patterns used in other graphical applications are utilized in Android.
This lecture references code found at https://github.com/info448-s17/lecture02-activities, in the android/ folder. As a first step, you’ll need to create a new Android application with a single Empty Activity (e.g., MainActivity). Future chapters will have starter code to work from, but it is good practice to make a new application from scratch!
According to Google:
An Activity is an application component that provides a screen with which users can interact in order to do something.
You can think of an Activity as a single screen in your app, the equivalent of a “window” in a GUI system (or a JFrame in a Swing app). Note that Activities don’t need to be full screens: they can also be floating modal windows, embedded inside other Activities (like half a screen), etc. But we’ll begin by thinking of them as full screens. We can have lots of Activities (screens) in an application, and they are loosely connected so we can easily move between them.
In many ways, an Activity is a “bookkeeping mechanism”: a place to hold state and data, and tell to Android what to show on the display. It functions much like a Controller (in Model-View-Controller sense) in that regard!
Also to note from the documentation1:
An activity is a single, focused thing that the user can do.
which implies a design suggestion: Activities (screens) break up your App into “tasks”. Each Activity can represent what a user is doing at one time. If the user does something else, that should be a different Activity (and so probably a different screen).
2.1 Making Activities
We create our own activities by subclassing (extending) the framework’s Activity class. We use inheritance to make a specialized type of Activity (similar to extending JFrame in Swing apps). By extending this class we inherit all of the methods that are needed to control how the Android OS interacts with the Activity.
If you look at the default Empty MainActivity, it actually subclasses AppCompatActivity, which is a already specialized kind of Activity that provides an ActionBar (the toolbar at the top of the screen with the name of you app). If you change the class to just extend Activity, that bar disappears.
To make this change, you will need to import the Activity class! The keyboard shortcut in Android Studio is alt+return, or you can do it by hand (look up the package)! You can also set Android Studio to automatically import classes you use.
There are a number of other built-in Activity subclasses that we could subclass instead. We’ll mention them as they become relevant. Many on the books have been deprecated in favor of Fragments, which are sort of like “sub-activities” that get nested in larger Activities. We’ll talk about Fragments more in a letter lecture.
Other important point to note: does this activity have a constructor that we call? No! We never write code that instantiates our Activity (we never call new MainActivity()). There is no main method in Android. Activities are created and managed by the Android operating system when the app is launched.
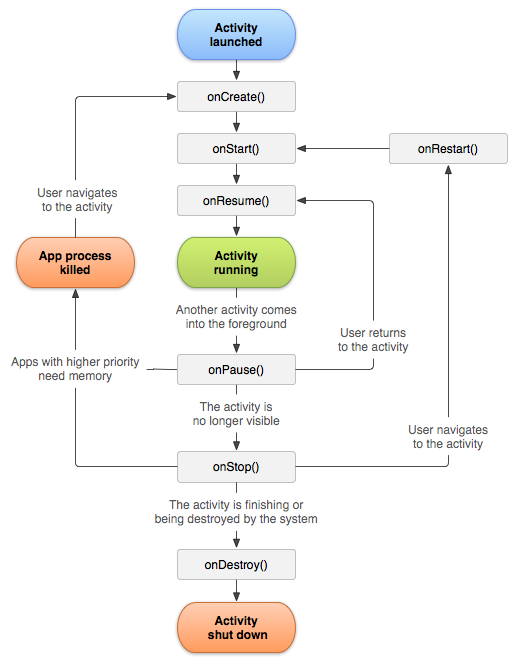
2.2 The Activity Lifecycle
Although we never call a constructor or main, Activities do have an incredibly well-defined lifecycle—that is, a series of events that occur during usage (e.g., when the Activity is created, when it is stopped, etc).
When each of these events occur, Android executes a callback method, similar to how you call actionPerformed() to react to a “button press” event in Swing. We can override these methods in order to do special actions (read: run our own code) when these events occur.
What is the lifecycle?
There are 7 “events” that occur in the Activity Lifecycle, which are designated by the callback function that they execute:
onCreate(): called when the Activity is first created/instantiated. This is where you initialize the UI (e.g., specify the layout to use), similar to what might go in a constructor.onStart(): called just before the Activity becomes visible to the user.The difference between
onStart()andonCreate()is thatonStart()can be called more than once (e.g., if you leave the Activity, thereby hiding it, and come back later to make it visible again).onResume(): called just before user interaction starts, indicating that the Activity is ready to be used! This is a little bit like when that Activity “has focus”.While
onStart()is called when the Activity becomes visible,onResume()is called when then it is ready for interaction. It is possible for an Activity to be visible but not interactive, such as if there is a modal pop-up in front of it (partially hiding it).onPause(): called when the system is about to start another Activity (so about to lose focus). This is the “mirror” ofonResume(). When paused, the activity stays visible!This callback is usually used to quickly and temporarily store unsaved changes (like saving an email draft in memory) or stop animations or video playback. The Activity may be being left (on its way out), but could just be losing focus.
onStop(): called when the activity is no longer visible. (e.g., another Activity took over, but this also be because the Activity has been destroyed. This callback is a mirror ofonStart().This callback is where you should persist any state information (e.g., saving the user’s document or game state). It is intended to do more complex “saving” work than
onPause().onRestart(): called when the Activity is coming back from a “stopped” state. This event allows you to run distinct code when the App is being “restarted”, rather than created for the first time. It is the least commonly used callback.onDestroy(): called when the Activity is about to be closed. This can happen because the user ended the application, or (and this is important!) because the OS is trying to save memory and so kills the App.Android apps run on devices with significant hardware constraints in terms of both memory and battery life. Thus the Android OS is very aggressive about not leaving Apps running “in the background”. If it determines that an App is no longer necessary (such as because it has been hidden for a while), that App will be destroyed. Note that this destruction is unpredictable, as the “necessity” of an App being open is dependent on the OS’s resource allocation rules.
The
onDestroy()callback can do final app cleanup, but its better to have such functionality inonPause()oronStop().
Note that apps may not need to use all of these callbacks! For example, if there is no difference between starting from scratch and resuming from stop, then you don’t need an onRestart() (since onStart() goes in the middle). Similarly, onStart() may not be needed if you just use onCreate() and onResume(). But these lifecycles allow for more granularity and the ability to avoid duplicate code.
2.2.1 Overriding the Callback Methods
In the default MainActivity the onCreate() callback has already been overridden for us, since that’s where the layout is specified.
Notice that this callback takes a Bundle as a parameter. A Bundle is an object that stores key-value pairs, like a super-simple HashMap (or an Object in JavaScript, or dictionary in Python). Bundles can only hold basic types (numbers, Strings) and so are used for temporarily “bunding” small amounts of information.
This Bundle parameter in particular stores information about the Activity’s current state (e.g., what text they may have typed into a search box), so that if the App gets killed it can be restarted in the same state and the user won’t notice that it was ever lost! The Bundle stores current layout information in it by default (if the Views have ids)—technically, it calls a onSaveInstanceState() callback for each View in the layout, and the provided Views that we utilize tend to save important state information (like entered text) already. See Saving and restoring activity state for details.
Also note that we call super.onCreate(). Always call up the inheritance chain!. This allows the system-level behavior to continue without any problem.
We can also add other callbacks: for example, onStart() (see the documentation for examples).
But how can we know if the lifecycle events are getting called?
2.3 Logging & ADB
In Android, we can’t use System.out.println() because we don’t actually have a terminal to print to! More specifically, the device (which is where the application is running) doesn’t have access to standard out (stdout), which is what Java means by System.out.
- It is possible to get access to
stdoutwithadbusingadb shell stop; adb shell setprop log.redirect-stdio true; adb shell start, but this is definitely not ideal.
Instead, Android provides a Logging system that we can use to write out debugging information, and which is automatically accessible over the adb (Android Debugging Bridge). Logged messages can be filtered, categorized, sorted, etc. Logging can also be disabled in production builds for performance reasons (though it often isn’t).
To perform this logging, we’ll use the android.util.Log3 class. This class includes a number of static methods, which all basically wrap around println to print to the device’s log file, which is then accessible through the adb.
- Remember to import the
Logclass!
The device’s log file is stored persistantly… sort of. It’s a 16k file, but it is shared across the entire system. Since every single app and piece of the system writes to it, it fills up fast. Hence filtering/searching becomes important, and you tend to watch the log (and debug your app) in real time!
2.3.1 Log Methods
Log provides methods that correspond to different level of priority (importance) of the messages being recorded. From low to high priority:
Log.v(): VERBOSE output. This is the most detailed, for everyday messages. This is often the go-to, default level for logging.Ideally,
Log.v()calls should only be compiled into an application during development, and removed for production versions.Log.d(): DEBUG output. This is intended for lower-level, less detailed messages (but still code-level, that is referring to specific programming messages).These messages can be compiled into the code but are removed at runtime in production builds through Gradle.
Log.i(): INFO output. This is intended for “high-level” information, such at the user level (rather than specifics about code)Log.w(): WARN output. For warningsLog.e(): ERROR output. For errorsAlso if you look at the API…
Log.wtf()!
These different levels are used to help “filter out the noise”. So you can look just at errors, at errors and warnings, at error, warn, and info… all the way down to seeing everything with verbose. A huge amount of information is logged, so filtering really helps!
Each Log method takes two Strings as parameters. The second is the message to print. The first is a “tag”—a String that’s prepended to the output which you can search and filter on. This tag is usually the App or Class name (e.g., “AndroidDemo”, “MainActivity”). A common practice is to declare a TAG constant you can use throughout the class:
private static final String TAG = "MainActivity";2.3.2 Logcat
You can view the logs via adb (the debugging bridge) and a service called Logcat (from “log” and “conCATenation”, since it concats the logs). The easiest way to check Logcat is to use Android Studio. The Logcat browser panel is usually found at the bottom of the screen after you launch an application. It “tails” the log, showing the latest output as it appears.
You can use the dropdown box to filter by priority, and the search box to search (e.g., by tag if you want). Android Studio also lets you filter to only show the current application, which is hugely awesome. Note that you may see a lot of Logs that you didn’t produce, including possibly Warnings (e.g., I see a lot of stuff about how OpenGL connects to the graphics card). This is normal!
It is also possible to view Logcat through the command-line using adb, and includes complex filtering arguments. See Logcat Command-line Tool for more details.
Demo: And now we can finally log out some of the Lifecycle callbacks to see them being executed!
- Start by implementing
onResume(). Note the wonders of tab completion! Have it log out atINFOlevel. On the device, hit the mainmenu(circle) button to send the Activity to the background, and watch the callback be executed. - Implement
onStop()and switch out of the app to watch it be stopped. onDestroy()can easily be called if you set the phone to “Don’t Keep Activities” (at bottom of developer settings). Or you can simply rotate the phone (which causes the Activity to be destroyed and then recreated in the new orientation).- Something else to test: Cause the app to throw a runtime
Exceptionin one of the handlers. For example, you could make a new local array and try to access an item out of bounds. Or justthrow new RuntimeException()(which is slightly less interesting). Can you see the Stack Trace in the logs?
Logging is fantastic and one of the the best techniques we have for debugging, both in how Activities are being used or for any kind of bug (also RuntimeExceptions). It harkens back to printline debugging, which is still a legitimate debugging process.
Note that Android Studio does have a built-in debugger if you’re comfortable with such systems.
2.4 Basic Events
Once you can “output” some content (via Log), the next step is to add some “input” via an interface element: for example, a Button we can click.
In res/layouts/activity_main.xml (the Activity’s layout), add the following code inside the <android.support.constraint.ConstraintLayout> element, replacing the current <TextView> element.
<Button
   android:id="@+id/my_button"
     android:layout_width="wrap_content"
     android:layout_height="wrap_content"
     android:text="Start Activity"
     />
This XML defines a Button. The android:text attribute specifies the text that is on the button. The next lecture will describe in more detail how exactly this XML works (and what’s is meant by the id, and layout_width/height), but you should be able to make a pretty good educated guess based on the names.
- Defining this in XML is basically the same process as creating the
JButtonand adding it to theJFramein Java!
Now we have a button, but we want to be able to click on it. So we need to register a “listener” for it (in Java), just like with Swing apps:
Button button = (Button)findViewById(R.id.my_button);
button.setOnClickListener(new View.OnClickListener() {
   public void onClick(View v) {
        // Perform action on click
   }
});
First we need to get access to a variable that represents that Button we defined in the XML. The findViewById() method “finds” the appropriate XML element with the given id. We discuss why we wrote the parameter as R.id.my_button in the next lecture tomorrow. Note that this method returns a View, so we want to cast the value into the more specific Button (which has methods we want to use).
We can register a listener with that button through the .setOnClickListener() method, passing in an anonymous class to act as the listener. (Again, tab-completion is our friend!). This is just like what you would do with a Swing app.
Finally, we can fill in the method to have it log out something when clicked.
Overall, this button is an example of an Input Control. These will be discussed in more detail in Lecture 4.
2.5 Multiple Activities
The whole point of interfacing with the Activity Lifecycle is handle the fact that Android applications can have multiple activities and interact with multiple other applications. In this section we’ll briefly discuss how to include multiple Activities within an app (in order to sense how the life cycle may affect them). Note that working with multiple Activities will be discussed in more detail in a later lecture.
We can easily create a New Activity through Android Studio by using File > New > Activity. We could also just add a new .java file with the Activity class in it, but using Android Studio will also provide the onCreate() method stub as well as a layout resource.
- For practice, make a new Empty Activity called
SecondActivity. You shuld edit this Activity’s layout resource so that the<TextView>displays an appropriate message.
Importantly, for every Activity we make, an entry gets added to the Manifest file AndroidManifest.xml. This file acts like the “table of contents” for our application, telling the device Operating System information about what our app looks (that is, what Activities it has) like so that the OS can open appropriate Activities as needed.
Activities are listed as <activity> elements nested in the <application> element. If you inspect the file you will be able to see an element representing the first MainActivity; that entry’s child elements will be discussed later.
- We can add
android:labelattributes to these<activity>elements in order to give the Activities nicer display names (e.g., in the ActionBar).
2.5.1 Intents and Context
In Android, we don’t start new Activities by instantiating them (remember, we never instantiate Activities!). Instead, we send the operating system a message requesting that the Activity perform a particular action (i.e., start up and display on the screen). These messages are called Intents, and are used to communicate between app components like Activities. The Intent system allows Activities to communicate, even though they don’t have references to each other (we can’t just call a method on them).
I don’t have a good justification for the name, other than Intents announce an “intention” for the OS to do something (like start an Activity)
You can think of Intents as like envelopes: they are addressed to a particular target (e.g., another Activity—or more properly a
Context), and contain a brief message about what to do.
An Intent is an object we can instantiate: for example, we can create a new Intent in the event handler for when we click the button on MainActivity. The Intent class has a number of different cnstructors, but the one we’ll start with looks like:
Intent intent = new Intent(MainActivity.this, SecondActivity.class);The second parameter to this constructor is the class we want to send the Intent to (the .class property fetches a reference to the class type; this is metaprogramming!). Effectively, it is the “address” on the envelop for the message we’re sending.
The first parameter refers to the current Context4 in which the message should be delivered. Context is an abstract class (and a superclass of Activity) that acts as a reference for information about the current running environment: it represents environmental data (information like “What OS is running? Is there a keyboard plugged in?”). You can almost think of the Context as representing the “Application”, though it’s broader than that (Application is actually a subclass of Context!)
The Context is used to do “application-level” actions: mostly working with resources (accessing and loading them), but also communicating between Activities like we’re doing now. Effectively, it lets us refer to the state in which we are running: the “context” for our code (e.g., “where is this occurring?”). It’s a kind of reflection or meta-programming, in a way.
There are a couple of different kinds of Contexts we might wish to refer to:
The Application context (e.g., an
Applicationobject) references the state of the entire application. It’s basically the Java object that is built out of the<application>element in the Manifest (and so contains that level of information).The Activity context (e.g., an
Activityobject) that references the state of that Activity. Again, this roughly corresponds to the Java objects created out of the<activity>tags from the Manifest.
Each of these Context objects exist for the life of its respective component: that is, an Activity Context is available as long as the Activity exists (disappearing after onDestroy()), whereas Application Contexts survive as long as the application does. Note htat we’ll almost always use the Activity context, as it’s safer and less likely to cause memory leaks.
- Inside an
Activityobject (e.g., in a lifecycle callback function), you can refer to the currentActivityusingthis. And sinceActivityis aContext, you can also usethisto refer to the current Activity context. You’ll often seeContextmethods called as undecorated methods (without an explicitthis).
After having instantiated the new Intent, we can use that message to start an Activity by calling the startActivity() method (inherited from Activity), passing it the Intent:
startActivity(intent);This method will “send” the message to the operating system, which will deliver the Intent to the appropriate Activity, telling that Activity to start as soon as it receives the message.
With this interaction in place, we can now click a button to start a second activity, and see how that impacts our Lifecycle callbacks.
- And we can use the back button to go backwards!
There are actually a couple of different kinds of Intents (this is an Explicit Intent, because it is explicit about what Activity it’s sent to), and a lot more we can do with them. We’ll dive into Intents in more detail later; for now we’re going to focus on mostly Single Activities.
- For example, if you look back at the Manifest, you can see that the
MainActivityhas an<intent-filter>child element that allows it to receive particular kinds of Intents—including ones for when an App is launched for the first time!
2.6 Back & Tasks
We’ve shown that we can have lots of Activities (and of course many more can exist cross multiple apps), and we are able to move between them by sending Intents and clicking the “Back” button. But how exactly is that “Back” button able to keep track of where to go to?
The abstract data type normally associated with “back” or “undo” functionality is a stack, and that is exactly what Android uses. Every time you start a new Activity, Android instantiates that object and puts it on the top of a stack. Then when you hit the back button, that activity is “popped” off the stack and you’re taken to the Activity that is now at the top.
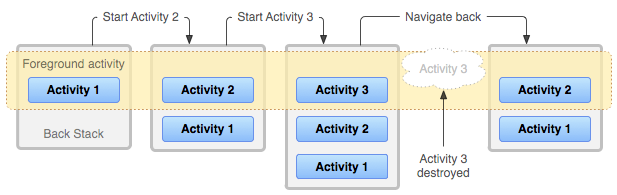
An example of the Activity stack, from Google5.
However, you might have different “sequences” of actions you’re working on: maybe you start writing an email, and then go to check your Twitter feed through a different set of Activities. Android breaks up these sequences into groups called Tasks. A Task is a collection of Activities arranged in a Stack, and there can be multiple Tasks in the background of your device.
Tasks usually start from the Android “Home Screen”—when you launch an application, that then starts a new Task. Starting new Activities from that application will add them to the Stack of the task. If you go back to the Home Screen, the Task you’re currently on is moved to the background, so the “back” button won’t let you navigate that Stack.
It’s useful to think of Tasks as being like different tabs or browsers, with the “back stack” being the history of web pages visited wthin that tab.
As a demonstration, try switching to another (built-in) app and then back to the example app; how does the back button work in each situation?
An important caveat: Tasks are distinct from one another, so you can have different copies of the same Activity on multiple stacks (e.g., the Camera activity could be part of both Facebook and Twitter app Tasks if you are on a selfie binge). It is possible to modify this behavior though, see - Though it is possible to modify this, see Managing Tasks